Tired of tangled necklaces and searching for the perfect accessory every morning? A DIY necklace holder is the solution you’ve been looking for! Not only does it keep your jewelry organized, but it also adds a touch of personality and creativity to your space.
Whether you’re a seasoned DIYer or just starting out, this guide will inspire you to craft your own unique necklace holder. Let’s dive into the world of functional and beautiful jewelry organization!
Why Make Your Own Necklace Holder?
Before we jump into the DIY projects, let’s explore why making your own necklace holder is worth your time and effort.
Benefits of a DIY Necklace Holder
- Customization: Tailor the design to match your room decor and personal style.
- Affordable: Use inexpensive or recycled materials to save money.
- Organization: Keep your necklaces tangle-free and easy to access.
- Eco-Friendly: Repurpose old items to create something new and sustainable.
- Fun and Creative: Enjoy the process of crafting a piece that’s uniquely yours.
Now that you’re convinced, let’s look at some fantastic ideas to inspire your DIY necklace holder project.
1. Rustic Wooden Necklace Holder
A rustic wooden necklace holder combines functionality with farmhouse charm. This design is simple to make and looks great in any space.
Materials You’ll Need
- A wooden board or pallet
- Hooks or nails
- Sandpaper
- Wood stain or paint
- Drill or hammer
- Mounting hardware

Step-by-Step Instructions
- Prepare the Wood:
- Sand the wooden board to smooth out rough edges.
- Apply wood stain or paint to match your decor. Let it dry completely.
- Attach Hooks:
- Evenly space out hooks or nails along the board. Use a drill or hammer to secure them.
- Add Mounting Hardware:
- Attach hardware to the back of the board for easy wall mounting.
- Mount on the Wall:
- Hang the holder in a convenient location, like above a dresser or near your closet.
Customization Tips
- Use decorative knobs instead of plain hooks for a unique look.
- Add a shelf on top to hold other jewelry items like earrings or rings.
2. Frame Necklace Holder
Transform an old picture frame into a chic necklace holder. This project is ideal for those who love upcycling and want a stylish way to display their jewelry.
Materials You’ll Need
- An old picture frame
- Chicken wire or a fabric backing
- Hooks or small clothespins
- Spray paint (optional)
- Staple gun
Step-by-Step Instructions
- Prep the Frame:
- Remove the glass and backing from the frame.
- Spray paint the frame if desired and let it dry.
- Attach the Backing:
- Secure chicken wire or fabric to the back of the frame using a staple gun.
- Add Hooks or Clips:
- Attach hooks directly to the wire or use clothespins to hang necklaces.
- Mount or Display:
- Hang the frame on the wall or place it on a vanity table for easy access.
Customization Tips
- Add fairy lights around the frame for a whimsical touch.
- Use patterned fabric to match your room’s theme.
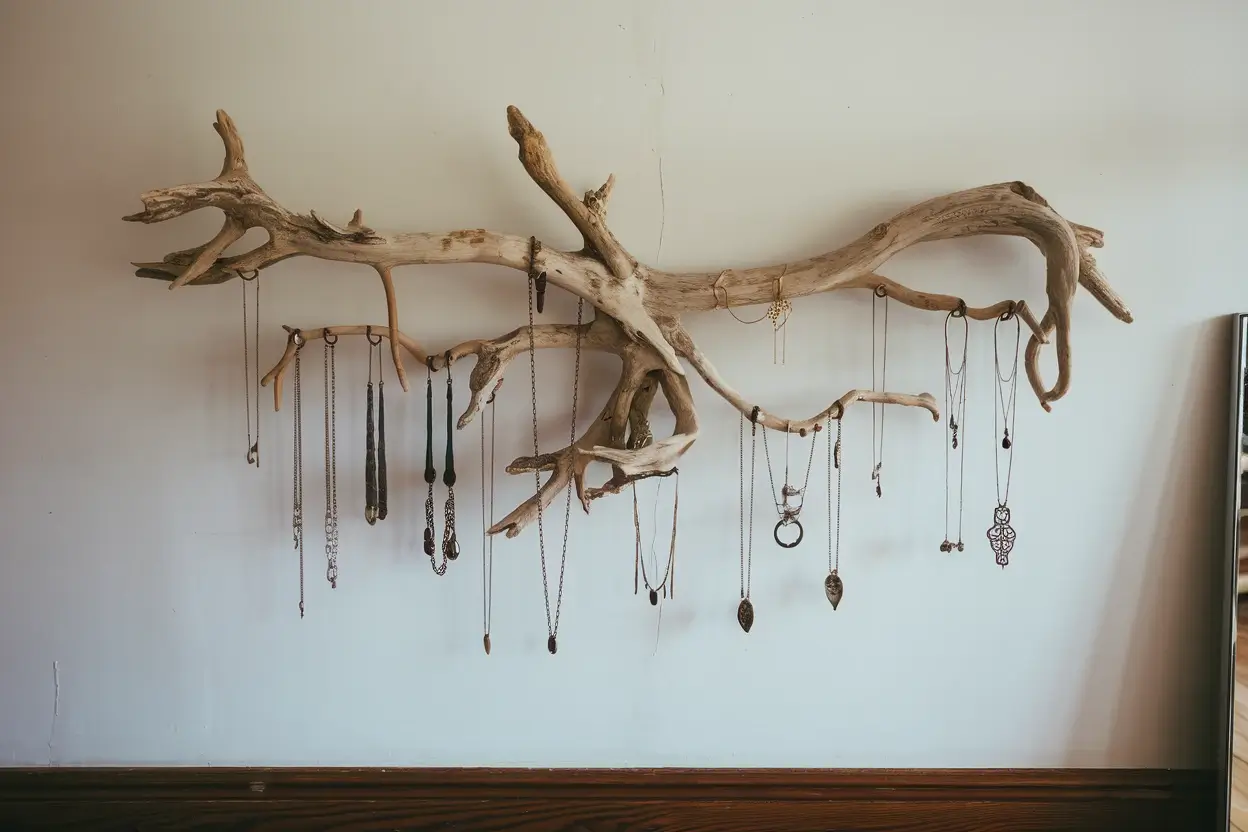
3. Driftwood Necklace Holder
For a bohemian or coastal vibe, a driftwood necklace holder is an excellent choice. It’s natural, unique, and adds a rustic charm to your space.
Materials You’ll Need
- A piece of driftwood
- Hooks or small nails
- Rope or twine
- Drill
- Sandpaper

Step-by-Step Instructions
- Prepare the Driftwood:
- Sand the driftwood to remove rough spots and dirt.
- Attach Hooks or Nails:
- Drill holes along the driftwood and screw in hooks or hammer in nails.
- Add Hanging Rope:
- Tie rope or twine to each end of the driftwood to create a hanger.
- Hang on the Wall:
- Use a wall hook or nail to mount the driftwood holder.
Customization Tips
- Paint or decorate the driftwood to match your style.
- Add beads or tassels to the hanging rope for extra flair.
For more inspirational DIY projects, you should discover 2 of our articles for some ideas:
4. Pegboard Necklace Holder
A pegboard is a versatile option that allows you to organize necklaces and other accessories in one place. It’s perfect for those who need lots of storage space.
Materials You’ll Need
- A pegboard
- Pegboard hooks
- Paint or wallpaper (optional)
- Screws and mounting hardware
Step-by-Step Instructions
- Prep the Pegboard:
- Paint or cover the pegboard with wallpaper to enhance its look.
- Add Hooks:
- Arrange hooks on the board based on the length and number of your necklaces.
- Mount the Pegboard:
- Secure the pegboard to the wall using screws and mounting hardware.
- Organize Your Necklaces:
- Hang your necklaces on the hooks for easy access.
Customization Tips
- Include small baskets or shelves for bracelets and earrings.
- Use colored hooks to add a playful touch.
5. Jewelry Tree Necklace Holder
A jewelry tree is both decorative and functional. It’s ideal for vanities or dresser tops, offering a freestanding option for necklace storage.
Materials You’ll Need
- A small branch or metal tree stand
- Spray paint (optional)
- A sturdy base (e.g., a wooden block or pot filled with cement)
- Glue or screws

Step-by-Step Instructions
- Prepare the Tree:
- Clean and sand the branch or paint the metal stand if desired.
- Secure to the Base:
- Attach the tree to a base using glue or screws.
- Decorate and Organize:
- Add decorative elements like beads or paint, then hang necklaces from the branches.
Customization Tips
- Use gold or silver spray paint for a metallic finish.
- Decorate the base with fabric or wrapping paper to match your decor.
FAQ: DIY Necklace Holder
What materials are best for a DIY necklace holder?
Wood, driftwood, pegboards, and frames are popular choices due to their versatility and availability. Choose materials that suit your style and budget.
Can I make a necklace holder without tools?
Yes! Options like fabric-covered boards or simple hooks on a frame require minimal tools and effort.
How do I keep my necklaces from tangling?
Spacing out hooks and ensuring each necklace hangs freely can prevent tangling. A pegboard or frame with ample space works best for this.
A DIY necklace holder isn’t just practical; it’s a chance to showcase your creativity and make something uniquely yours. From rustic wooden designs to elegant framed options, there’s a style for everyone.
Ready to get started? Check out our Pinterest account for more DIY inspiration or explore other articles on creative home projects.
Have your own necklace holder ideas? Share them in the comments below—we’d love to hear from you!